Whenever we build a web or mobile application, implementing a login system for user authentication is usually necessary.
System Structure
System Strcture is same as below
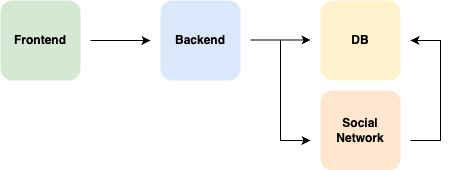
When a user initiates a login from the frontend, both OAuth2 and default login requests are forwarded to the server.
The server then separates the logic depending on the type of request.
In the case of OAuth2, the server redirects the user to the appropriate social login page to handle authentication.
Upon successful login, the server issues authentication to the user via a cookie.
Normally, we use two types as shown below:
- Session
- Token
In this post, we focus on JWT as the method of authentication.
JWT (JSON Web Token) is a lightweight authentication method where the server doesn’t store session data but instead uses a token to verify users, making it faster than session-based authentication.
Implementation
The following code examples are based on default login.
Our tech stack includes TypeScript, React, Spring Boot, and Java.
When implementing a login system, the following code sends the data from the frontend to the server.
typescriptconst login: SubmitHandler<LoginInput> = async (data) => {
    try {
        await axios.post(`${process.env.API_URL}/auth/login`, {
            email: data.email,
            password: data.password
        }, {
            withCredentials: true
        });
        await fetchUser();
        router.push('/');
    } catch (e) {
        if (axios.isAxiosError(e)) {
            if (e.response?.data.status === 'not_verify') {
                setModalTitle('Email verification required');
                setModalMessage('For security reasons, email verification is required. A verification email has been sent to your registered email address, so please check your inbox and follow the instructions to complete the verification. After verifying your email, you will be able to log in normally.');
                setIsModalOpen(true);
                return;
            }
            if (e.response?.status === 400) {
                setModalTitle('Login failed');
                setModalMessage('Login failed. Please check your email and password.');
                setIsModalOpen(true);
                return;
            }
        }
        console.log(e);
        alert("An unexpected error occurred.");
    }
};
The server then verifies the user by receiving the login information.
java// controller
@PostMapping("/login")
public ResponseEntity<String> login(@Valid @RequestBody LoginRequestDto loginRequestDto) {
    User user = userService.login(loginRequestDto);
    ResponseCookie jwtCookie = jwtTokenProvider.getJwtCookie(user);
    return ResponseEntity.ok()
            .header(HttpHeaders.SET_COOKIE, jwtCookie.toString())
            .body("login success");
}
//LoginRequestDto <= login info

// Service
public User login(LoginRequestDto loginRequestDto) {
    Optional<User> userOptional = userRepository.findByEmail(loginRequestDto.getEmail());
    User user = userOptional.orElseThrow(NoExistUserException::new);

    if (!new BCryptPasswordEncoder().matches(loginRequestDto.getPassword(), user.getPassword())) {
        throw new NoExistUserException();
    }
    if (!user.isVerified()) {
        throw new NotVerifyUserException();
    }

    return user;
}
The following codes manage JWT.
java//JwtProvider
public ResponseCookie getJwtCookie(User user) {
    String token = createToken(user);
    return cookieFactory(token, EXPIRATION_HOURS * 60 * 60 * 1000);
}

public String createToken(User user) {
    return Jwts.builder()
            .subject(user.getEmail())
            .claim("name", user.getName())
            .claim("role", user.getRole())
            .issuedAt(new Date())
            .expiration(new Date(System.currentTimeMillis() + (EXPIRATION_HOURS * 60 * 60 * 1000)))
            .signWith(key)
            .compact();
}

public ResponseCookie cookieFactory(String token, int maxAge) {
    if (activeProfile.equals("local")) {
        return ResponseCookie.from("Authorization", token)
                .httpOnly(true)
                .secure(false)
                .path("/")
                .maxAge(maxAge)
                .sameSite("Lax")
                .build();
    }

    return ResponseCookie.from("Authorization", token)
            .httpOnly(true)
            .secure(true)
            .path("/")
            .maxAge(maxAge)
            .sameSite("None")
            .build();
}
In this code, the JWT manager validates the login information in the service, and then generates and returns an authentication token based on the user’s data.
Once the token is stored in the cookie and sent to the frontend, the frontend can send it back to the server with {withCredentials: true}, enabling the server to authenticate the user using the token.
All the code has been written and shared in the Git repository.
Frontend: https://github.com/pkt369/login-nextjs
Backend: https://github.com/pkt369/login-springboot
Result
Login is easier to implement than it seems, but if we run into issues, it can take up a lot of time. However, once you understand it, it becomes straightforward.
Finally, here are the key points to keep in mind when implementing login.
1. Manage token expiration time
If the token is expired, we should provide a refresh token or redirect the user to the login page with an alert about the expiration.
In this case, I have implemented the approach where the user is redirected to the login page to log in again.
2. Manage token time with cookie.
We can control the token’s expiration time using the following code:
expiration(new Date(System.currentTimeMillis() + (EXPIRATION_HOURS * 60 * 60 * 1000)))
Then we can check the expiration time with this logic.
We should also set the cookie’s expiration time, such as:
return cookieFactory(token, EXPIRATION_HOURS * 60 * 60 * 1000);
When setting time for the token or cookie, the time is based on milliseconds (ms).
This means 1 second equals 1000 milliseconds.
So, if we want to set the expiration time to 1 hour, we should write 1 * 60 * 60 * 1000.
3. CORS (Cross-Origin Resource Sharing)
If the URLs don’t match between the frontend and backend, we may encounter a CORS error.
This happens because of the browser’s security policy (Same-Origin Policy), which blocks requests by default. Therefore, the server needs to set the appropriate CORS configuration to allow these requests.
javapublic ResponseCookie cookieFactory(String token, int maxAge) {
    if (activeProfile.equals("local")) {
        return ResponseCookie.from("Authorization", token)
                .httpOnly(true)
                .secure(false)
                .path("/")
                .maxAge(maxAge)
                .sameSite("Lax")
                .build();
    }

    return ResponseCookie.from("Authorization", token)
            .httpOnly(true)
            .secure(true)
            .path("/")
            .maxAge(maxAge)
            .sameSite("None")
            .build();
}
In local environments, it’s difficult to communicate using HTTPS, so we set Secure to false and SameSite to Lax.
In other cases, we should use HTTPS and set SameSite to None.
Authentication
When JWT is stolen, the server has to trust the JWT token sent, since it’s signed.
To make it stronger, you can include the IP address in the token, and then check the IP from the request against the IP in the token.
Additionally, setting a short JWT expiration time and providing a refresh token can enhance security.
Share this post
Comments (0)
No comments yet. Be the first to comment!