Introduction
Previously, I used SSH and pem keys to access EC2 instances. As the number of servers and users grew, the number of management points kept increasing: creating keys for each server, sharing them, and revoking them.
To solve this problem, I adopted AWS Systems Manager Session Manager.
With AWS Systems Manager Session Manager, you can access EC2 from a browser or AWS CLI without opening the SSH port. Access can be controlled through IAM, and you do not need to share pem keys directly.
How SSM Access Works
To connect to EC2 through Session Manager, two things must be prepared.
- The EC2 instance must be managed by Systems Manager.
- The developer or operator must have permission to use Session Manager.
According to the AWS documentation, the EC2 instance must have SSM Agent installed and running, and it needs an IAM Role that includes the AmazonSSMManagedInstanceCore policy. If you want to connect through the CLI, your local machine also needs AWS CLI and the Session Manager plugin.
Prepare EC2
Create an IAM Role
Create an IAM Role in the AWS console.
- Console path: IAM -> Roles -> Create role
- Trusted entity type: AWS service
- Use case: EC2
- Permission policy:
AmazonSSMManagedInstanceCore
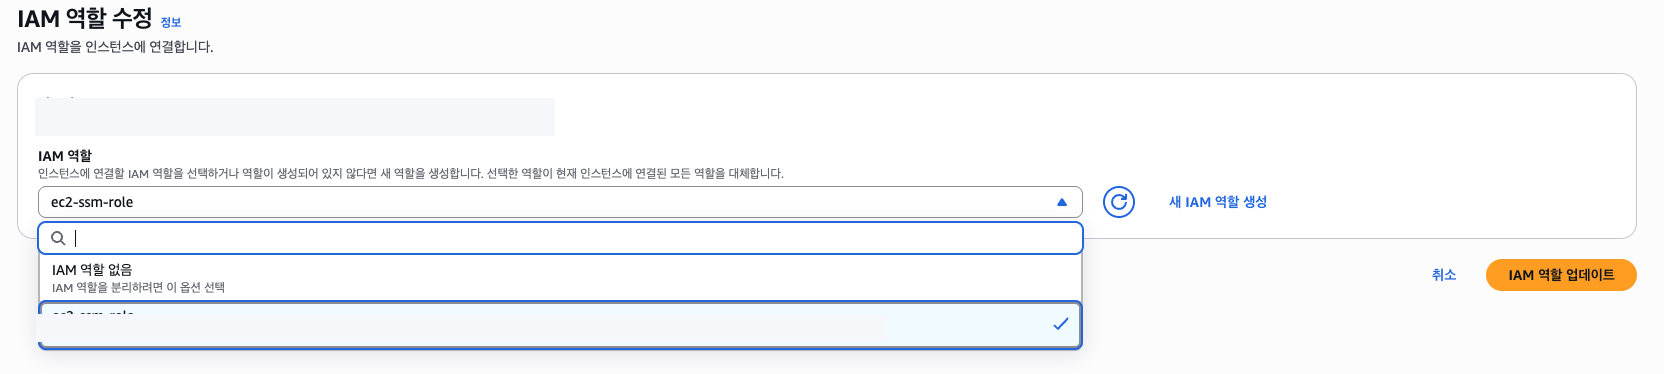
For example, you can name it something easy to identify, such as EC2-SSM-Role.
Attach the Role to EC2
Attach the Role to the EC2 instance.
- EC2 -> Instances
- Select the instance
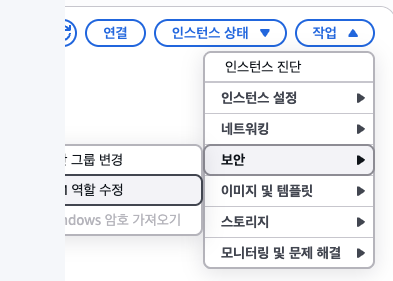
- Actions -> Security -> Modify IAM role
- Select the Role you created
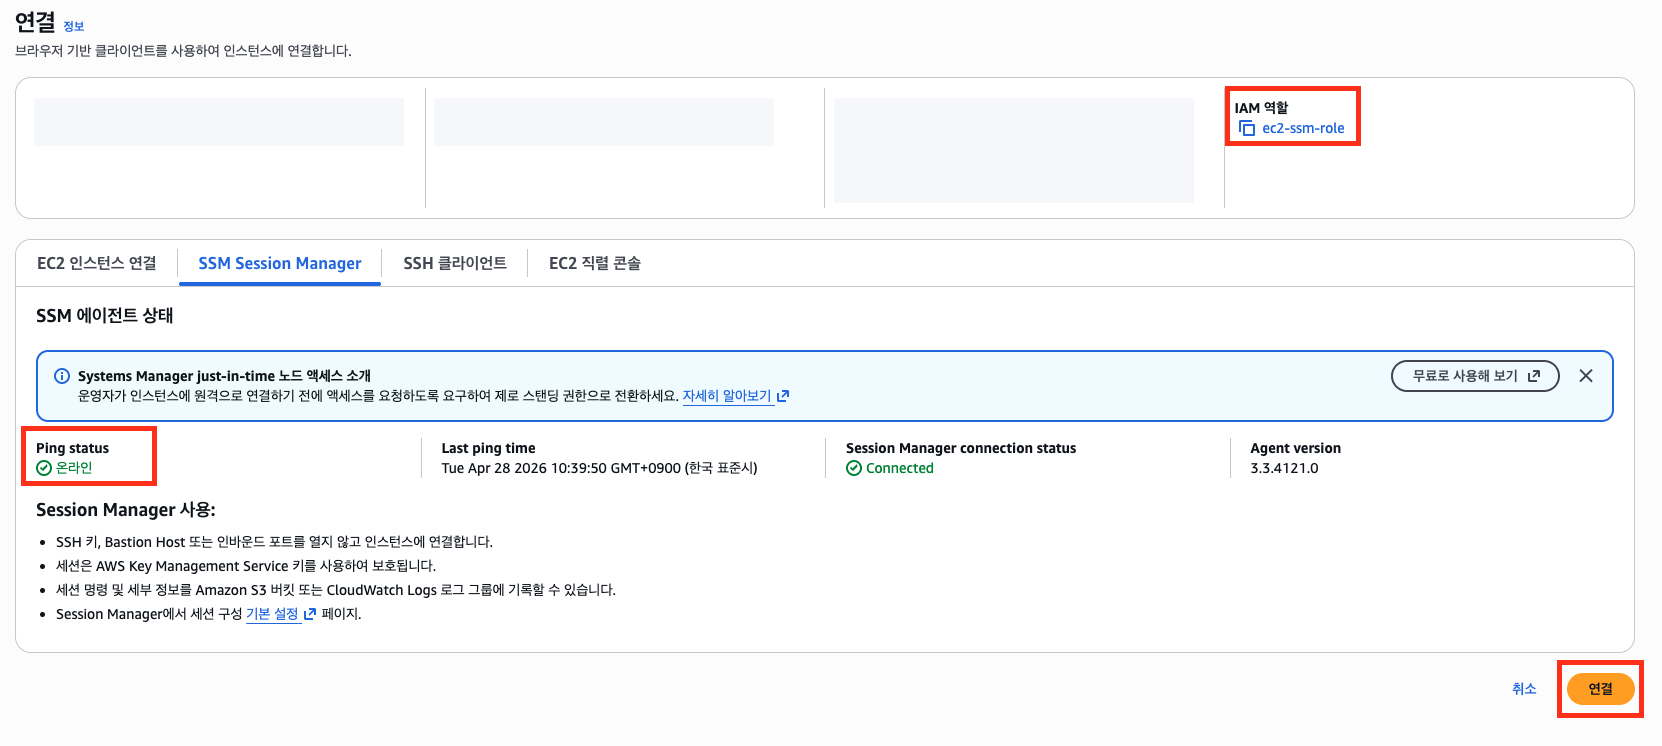
Check the Connection Status
After attaching the Role, check the instance in the EC2 console.
- EC2 -> Instances -> Select the instance
- Check whether it is marked as
Managed by Systems Manager - Or check whether the Connect -> Session Manager tab is enabled

If it does not appear immediately, check the following.
- Whether the IAM Role is attached correctly
- Whether SSM Agent is installed and running inside the instance
- Whether the instance can access Systems Manager endpoints through the internet or a NAT Gateway
- If the instance is in a private subnet, whether the required SSM VPC Endpoints are configured
- If you just attached the Role, wait a few minutes and check again
Prepare the Developer Account
The user who connects through Session Manager also needs permissions.
For a quick connectivity test, you can use AmazonSSMFullAccess, but it is too broad to leave in production. Remove it after testing, and create a separate policy that only allows the required actions. At minimum, starting a session requires ssm:StartSession. For CLI sessions to work correctly, you should also consider the session data channel and the permissions to terminate or resume sessions.
Connect from the Web Console
You can connect directly from the EC2 console.
- EC2 -> Instances
- Select the instance
- Connect
- Select the Session Manager tab
- Click Connect
After connecting, you can run commands as you would in a normal SSH session.
bash
whoami
Set Up CLI Access
To connect from the terminal instead of the web console, you need AWS CLI and the Session Manager plugin.
First, install AWS CLI.
brew install awscliCheck the installation:
aws --versionCLI Login
With AWS CLI v2, you can use aws login to receive temporary credentials based on your AWS Management Console session.
This avoids storing long-term access keys locally, and MFA can be applied during the console sign-in flow.
aws loginAfter login completes, AWS CLI stores temporary credentials for the selected console session.
You can verify that the CLI is authenticated and has SSM access with the following command.
aws ssm describe-instance-informationIf you use separate profiles, run aws login --profile <profile-name> and add --profile <profile-name> to the commands that follow.
Install the Session Manager Plugin
For macOS Apple silicon, you can install it as follows.
curl "https://s3.amazonaws.com/session-manager-downloads/plugin/latest/mac_arm64/session-manager-plugin.pkg" -o "session-manager-plugin.pkg"
sudo installer -pkg session-manager-plugin.pkg -target /
sudo ln -s /usr/local/sessionmanagerplugin/bin/session-manager-plugin /usr/local/bin/session-manager-plugin
Verify the installation:
session-manager-pluginIf the installation succeeded, you should see a message similar to this.
The Session Manager plugin is installed successfully. Use the AWS CLI to start a session.Connect from the CLI
First, check the instances managed by SSM.
aws ssm describe-instance-informationAfter finding the target instance ID, start a session.
aws ssm start-session --target <instance-id>If you frequently connect to specific instances, aliases are convenient. Replace the instance IDs with values from your own environment.
echo "
alias ssm-dev='aws ssm start-session --target <dev-instance-id>'
alias ssm-prod='aws ssm start-session --target <prod-instance-id>'
" >> ~/.zshrc

source ~/.zshrc
Port Forwarding
When you need to access a port inside EC2 from your local machine, you can use Session Manager port forwarding.
Port forwarding requires an SSM Agent version that supports the feature. If you are using an old AMI, update SSM Agent before relying on port forwarding.
For example, the following command maps port 5432 inside EC2 to local port 15432.
aws ssm start-session \
  --target <instance-id> \
  --document-name AWS-StartPortForwardingSession \
  --parameters '{"portNumber":["5432"],"localPortNumber":["15432"]}'
After the session starts, connect to localhost:15432 from your local machine.
Troubleshooting
Python/expat Error When Running aws --version
After installing awscli with Homebrew, you might see a Python pyexpat related error when running aws --version. In that case, try reinstalling the Homebrew packages first.
brew update
brew upgrade

brew reinstall expat
brew reinstall python
brew reinstall awscli

brew cleanup

aws --version
If that does not solve the issue, install AWS CLI using the official AWS pkg installer instead of the Homebrew package.
brew uninstall awscli

curl "https://awscli.amazonaws.com/AWSCLIV2.pkg" -o "/tmp/AWSCLIV2.pkg"
sudo installer -pkg /tmp/AWSCLIV2.pkg -target /

which aws
aws --version
Session Manager Tab Is Disabled
Check the following in order.
- Whether the EC2 instance has an IAM Role with
AmazonSSMManagedInstanceCore - Whether the SSM Agent is running inside the instance
- Whether the instance can access Systems Manager endpoints
- Whether the connecting user has
ssm:StartSessionpermission - Whether you waited a few minutes after attaching the Role
References
Share this post
Comments (0)
No comments yet. Be the first to comment!